
Fixing a Leaking Mixer Tap in Six Simple Steps

Everyone will encounter a leaking faucet at some time in their lives. It is one of those unpleasant plumbing issues that many people put off repairing until it is too late. If leaky faucets are neglected for too long, they can cause significant harm to your home and your finances.
The sooner you repair a leaking mixer tap, the less water, and money you’ll waste due to issues like low water pressure. Read on to learn more about the steps on how to fix a leaking sink mixer tap.
Table of Contents
Fixing a Leaking Sink Mixer Tap
1. Disconnect the water supply
Confirm that your mixer tap’s water supply has been disconnected before attempting to fix a leaky mixer tap. Either an isolation valve or a stop valve can be used to cut off the water supply. The stop valve is located adjacent to the water meter and the isolation valve is located on the supply pipes beneath the sink.
Turn on your mixer to expel any residual water in your pipes, and then block your sink to prevent any small components from dropping down the drain while you work.
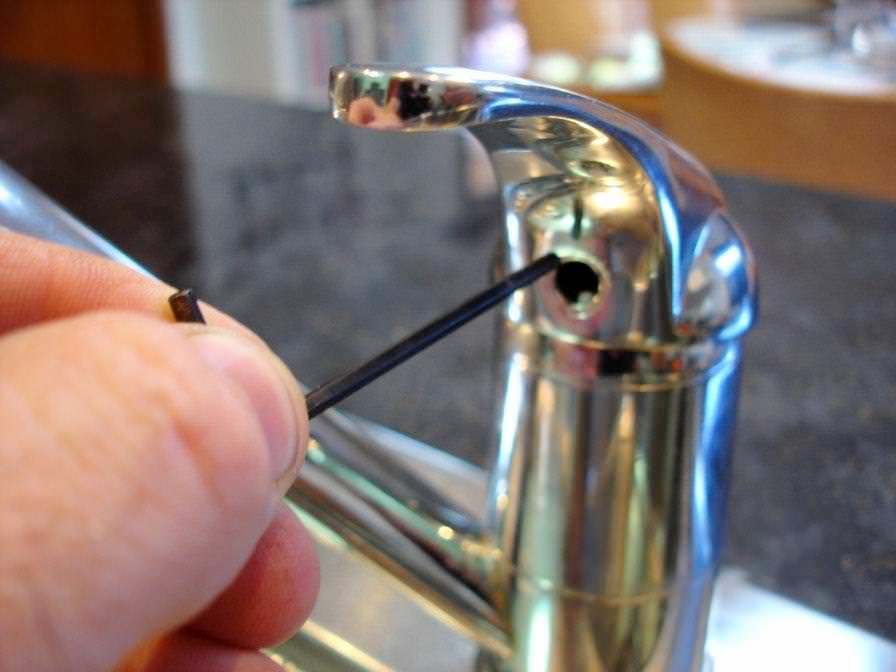
2. Remove the Plastic Cap
Locating and removing the cover that conceals the grub screw is the first big obstacle in repairing a leaky mixer tap. This cap is the hot/cold indication button found on the mixer to handle of most faucets.
Sometimes you can remove the cap with your nails, but if you’re having trouble, you can use a Stanley knife to delicately raise the button and a tiny, flat-head screwdriver to pull it out. You may damage the cap if you are not cautious, but replacements are readily available at most plumbing and hardware stores.
3. Eliminate the Grub Screw and Handle
After removing the cover from the handle of your mixer, you will find a grub screw in the hole beneath. This screw is what secures your mixer tap’s handle to its base. Use your Allen key to loosen the grub screw until you can remove the cartridge handle from the spindle. The diameters of the grub screws vary from tap to tap, but a 2mm or 2.5mm Allen key would often suffice.
Calcium carbonate, often known as limescale, can sometimes cause the mixer handle to adhere to the base. If limescale is preventing you from removing the handle of your mixer, soak it in a mixture of half water and half vinegar. After around 20 minutes of soaking, you should be able to remove the handle from your mixer.
4. Eliminate the Chrome Dress Ring and Retain Nut
The following procedure involves removing the chrome dress ring. This ring has no flat edges; thus a pipe wrench will be required to remove it. After removing the dress ring, a brass retaining nut will be seen. Unscrew and remove your mixer’s ceramic cartridge using your spanner. Use an old rag between your tools and the mixer if you are worried about ruining the finish of your faucet.
5. Substitute the Cartridge
After gaining total access to the cartridge, remove and replace it with a brand-new cartridge of the same model. Ensure that you adhere to the manufacturer’s instructions and that the cartridge’s locator pins align.
6. Reassemble Mixer and Activate Water Supply
After installing the replacement cartridge, reassemble the faucet and resume the water supply via the stop or isolation valve. We advise keeping towels on hand in the event of leaks. If your mixer has been tested and the results are satisfactory, you are finished!
Bottom Line
To fix a leaky sink mixer tap, you only need time and effort. This article contains helpful information, but we recognize that not everyone has the time to do the repair. If you need assistance fixing one or many leaking faucets, you may visit a local plumber.


